Thumbnail Menu
The Thumbnails Menu is another of the Corte Certo innovations often copied by similar software. In Corte Certo it is presented in the form of a bar, just below the cutting plane highlighted in the visualization screen. It was developed with three main objectives in mind:
- Leave the entire cutting plane to the user’s hand for analysis, in a practical and visual way. In other words: in addition to having one of the cut maps highlighted on the screen, it has available, just below, all the other schematic maps of the calculated project.
- Provide quick information about each of the cut schemes.
- Facilitate the work of post-editing the suggested layouts, especially when it is necessary to interchange parts between different cutting schemes.
The Thumbnails Menu refers to a single project. These are all the cutting schemes needed to cut the same calculated design.
Nor do they represent options. It is the final solution proposed by Corte Certo, although open to changes by the user, through various available tools.
Notes:
White background: indicates the cut scheme that is highlighted, enlarged at the top of the Thumbnails Menu. To change the highlighted scheme, just click on the desired one in the Menu.
Orange background: indicates that a flap will be used for that plane.
Background with a different shade of blue: indicates a plate of a different size compared to the others. Note that the background color of the clipping plane can be changed by the user, making this new color also the reference for the Menu.
Repeat Counter: This is the number that appears at the top left of each cut scheme in the Menu. Depending on the situation, this number may overlap with the drawing of the plan, as there is no free space in the Menu.
Repeat Counter: It is the number that appears in the upper left part of each cut scheme in the Menu. Depending on the situation, this number may overlap with the drawing of the plan, as there is no free space in the Menu.
The number of cutting schemes is not always equivalent to the number of plates. This is a very common confusion: the user counts 10 schemes in the Thumbnails Menu and thinks he will use 10 plates. There is not always this equivalence because Corte Certo tries to stack sheets, that is, to make more sheets be cut in the same way. In the Thumbnails Menu itself or in the printed cutting plan, among other places, there are clear indications of the number of plates that must be cut with that same design.
Different colors for pieces, leftovers and scraps: even if in a simplified way, the Thumbnails Menu already presents distinctions through colors, which facilitate the identification of what each cutting scheme contains.
Parts in solid red: are those identified by the Parts Locator, a tool that allows the user to know in which cutting schemes a certain part has been positioned.
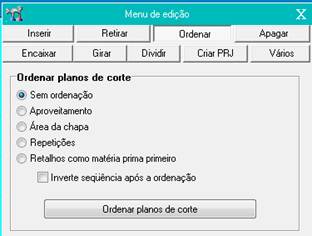
Ordering: in Corte Certo the sequence of cutting schemes comes randomly, as it is set to No ordering by default. This configuration can be changed, so that the sequence also becomes an analysis reference for the user. The schemes can be ordered by sheet size, for example, or by use, from best to worst. To do so, just go to the Editing Menu, on the Sort tab, as shown in the figure below:
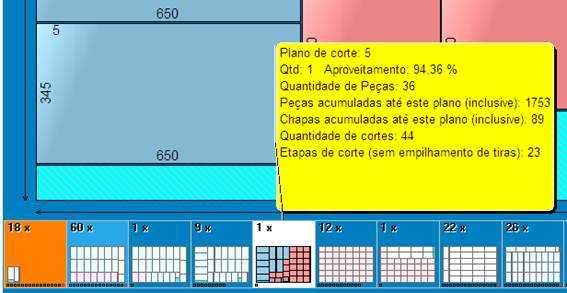
Cutting scheme information: just position the mouse cursor over a cutting scheme, without clicking, to open specific information about that scheme (how many sheets must be cut with that same layout, how many pieces were positioned for each sheet, what is the use of material for that plane separately, etc.) and also more generic data (how many pieces are accumulated, from the first cutting plane of the sequence; how many sheets will be used, only up to that specific cutting plane, etc.) – see example in the first illustration.
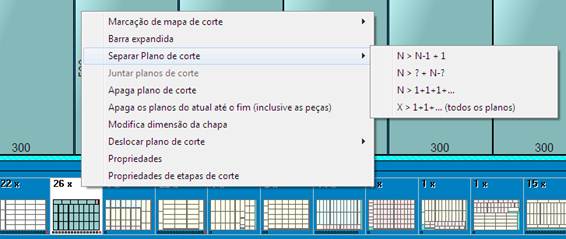
Options for editing cutting planes: click with the left mouse button on the desired cutting plane, within the Menu. The plane will be highlighted and tools like those shown in the illustration below will open.
An interesting option, shown in the illustration, is the one that allows you to separate the cutting schemes. In the example, 26 sheets are foreseen to be cut with the same template. If you only want to separate 1 of the sheets, choose N>N-1+1. You can also define the number of plates you want to separate, checking the option N>?+N-?. Or separate all 26, one by one, in the option N>1+1+1+…, or, still, separate all the sheets of all planes in X>1+1+… This solution is useful in situations when you want to eliminate or include parts in only some of the stacked sheets.
Another tool that becomes important when the project is very large (or when the separation of planes is necessary), making the drawings too miniature, is the “Bar expanded”. It creates a scroll bar and brings the clipping planes to a more comfortable size.
Another option is to view the Thumbnails Menu through the Overview button, which occupies the entire screen.
Note that there are still other editing options outside the Thumbnails Menu, which can be opened using the “Editing Menu” button, or by clicking inside or outside the highlighted plane.


